自建 VPN 沒煩惱,OpenVPN + Proxmox 手把手教學
如果你想要快速的建立一個 VPN,這一篇很適合你!20 秒內建好一個 Ubuntu server,輕輕鬆鬆

如果你想要快速的建立一個 VPN,這一篇很適合你!
首先你需要一台伺服器,這裡我是使用 Proxmox
Proxmox 可以快速開啟一個虛擬機,並且可以使用 UI 設定硬體配置與網路配置
20 秒內建好一個 Ubuntu server,輕輕鬆鬆
Ubuntu 23.04 testVPN tty1

testVPN login: root
Password:
Welcome to Ubuntu 23.04 (GNU/Linux 6.8.4-2-pve x86_64)

 * Documentation:  https://help.ubuntu.com
 * Management:     https://landscape.canonical.com
 * Support:        https://ubuntu.com/advantage

The programs included with the Ubuntu system are free software;
the exact distribution terms for each program are described in the
individual files in /usr/share/doc/*/copyright.

Ubuntu comes with ABSOLUTELY NO WARRANTY, to the extent permitted by
applicable law.
安裝步驟
下載別人編寫好的安裝引導 wget https://git.io/vpn -O openvpn-ubuntu-install.sh
--2024-09-24 13:46:18--  https://raw.githubusercontent.com/Nyr/openvpn-install/master/openvpn-install.sh
Resolving raw.githubusercontent.com (raw.githubusercontent.com)... 185.199.110.133, 185.199.109.133, 185.199.108.133, ...
Connecting to raw.githubusercontent.com (raw.githubusercontent.com)|185.199.110.133|:443... connected.
HTTP request sent, awaiting response... 200 OK
Length: 23534 (23K) [text/plain]
Saving to: 'openvpn-ubuntu-install.sh'

openvpn-ubuntu-install 100%[=========================>]  22.98K  --.-KB/s    in 0.01s

2024-09-24 13:46:19 (1.70 MB/s) - 'openvpn-ubuntu-install.sh' saved [23534/23534]

# 這時候會看到多了一個檔案
root@testVPN:~# ll
total 52
drwx------  4 root root  4096 Sep 24 13:46 ./
drwxr-xr-x 18 root root  4096 Sep 24 13:43 ../
-rw-r--r--  1 root root  3106 Oct 17  2022 .bashrc
drwx------  2 root root  4096 Sep 24 13:45 .cache/
-rw-r--r--  1 root root   161 Oct 17  2022 .profile
drwx------  2 root root  4096 Jun  8  2023 .ssh/
-rw-r--r--  1 root root   180 Sep 24 13:46 .wget-hsts
-rw-r--r--  1 root root 23534 Sep 24 13:46 openvpn-ubuntu-install.sh
執行下載好的檔案
root@testVPN:~# bash openvpn-ubuntu-install.sh

# 如果使用 sh 執行會出現這個錯誤訊息
root@testVPN:~# sh openvpn-ubuntu-install.sh
This installer needs to be run with "bash", not "sh".
PVE TUN Error
如果是使用 proxmox 會出現這個錯誤
The system does not have the TUN device available.
TUN needs to be enabled before running this installer.
搜尋關鍵字會發現有很多人遇到這個問題,是因為 proxmox 預設不會讓 CT 有底層的權限,
所以我們要進入 terminal 裡面把它打開
先關閉這台虛擬機,接這到 >_命令列 去執行下面的指令修改設定
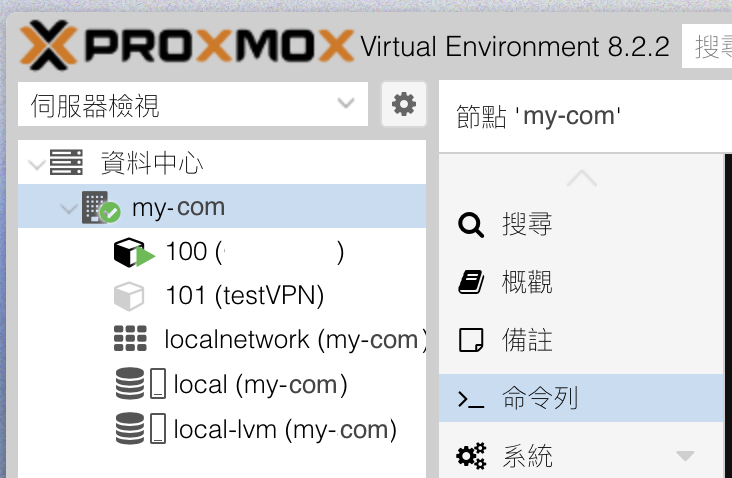
# 可以看到底下有你的 pvc id 相同名稱的設定檔
root@my-com:~# ls /etc/pve/lxc/
100.conf 101.conf

#修改要執行安裝的 vpn id 的設定檔
root@my-com:~# nano /etc/pve/lxc/101.conf

# 把下面兩行加入後儲存後退出
lxc.cgroup2.devices.allow: c 10:200 rwm
lxc.mount.entry: /dev/net dev/net none bind,create=dir
重啟你的 pve id 101 的虛擬機後重新執行安裝,接著就會進入引導模式
基本上除了使用者名稱以外,都使用預設的值就可以了( 按 Enter 會直接使用預設值 )
Welcome to this OpenVPN road warrior installer!

This server is behind NAT. What is the public IPv4 address or hostname?
Public IPv4 address / hostname [my ip]:

Which protocol should OpenVPN use?
   1) UDP (recommended)
   2) TCP
Protocol [1]:

What port should OpenVPN listen to?
Port [1194]:

Select a DNS server for the clients:
   1) Current system resolvers
   2) Google
   3) 1.1.1.1
   4) OpenDNS
   5) Quad9
   6) AdGuard
DNS server [1]:

Enter a name for the first client:
Name [client]: user001

OpenVPN installation is ready to begin.
Press any key to continue...
接著就會出現安裝成功的訊息並且提示 openvpn 登入設定檔案的路徑
Created symlink /etc/systemd/system/multi-user.target.wants/openvpn-iptables.service -> /etc/systemd/system/openvpn-iptables.service.
Created symlink /etc/systemd/system/multi-user.target.wants/[email protected] -> /lib/systemd/system/[email protected].

Finished!

The client configuration is available in: /root/user001.ovpn
New clients can be added by running this script again.
下載設定檔
至於要怎麼把設定檔複製出來呢?
我推薦一個指令:scp root@[192.168.xxx.xxx]:/root/user001.ovpn ./user001.ovpn
這個指令是說 scp root@[遠端ip]:遠端檔案路徑 本機存放路徑
如果顯示 permission denied,可以檢查看看 /etc/ssh/sshd_config 的 PermitRootLogin 是否有開啟:
PermitRootLogin yes
如有異動需要重啟 ssh:
sudo systemctl restart ssh
使用設定檔
首先你需要下載 OpenVPN 並且安裝
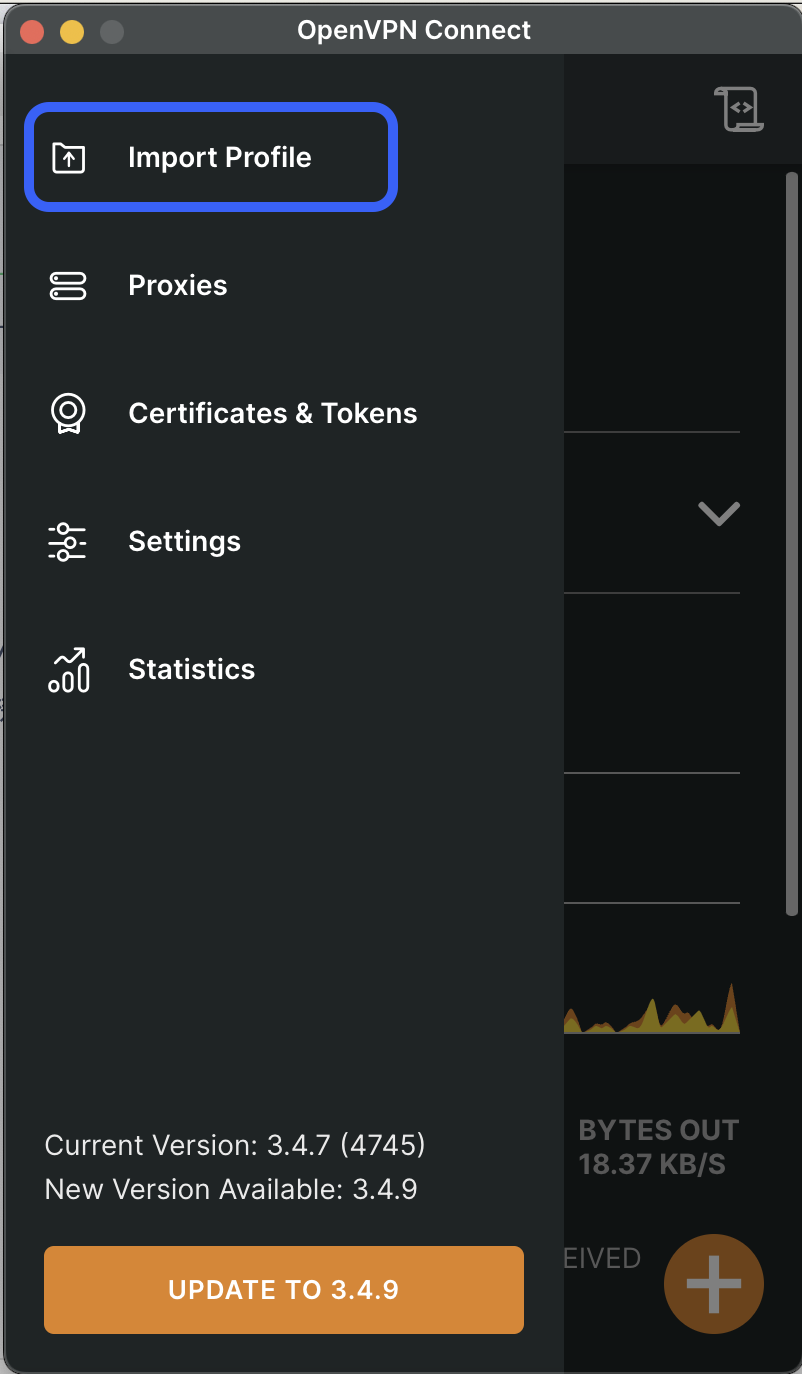
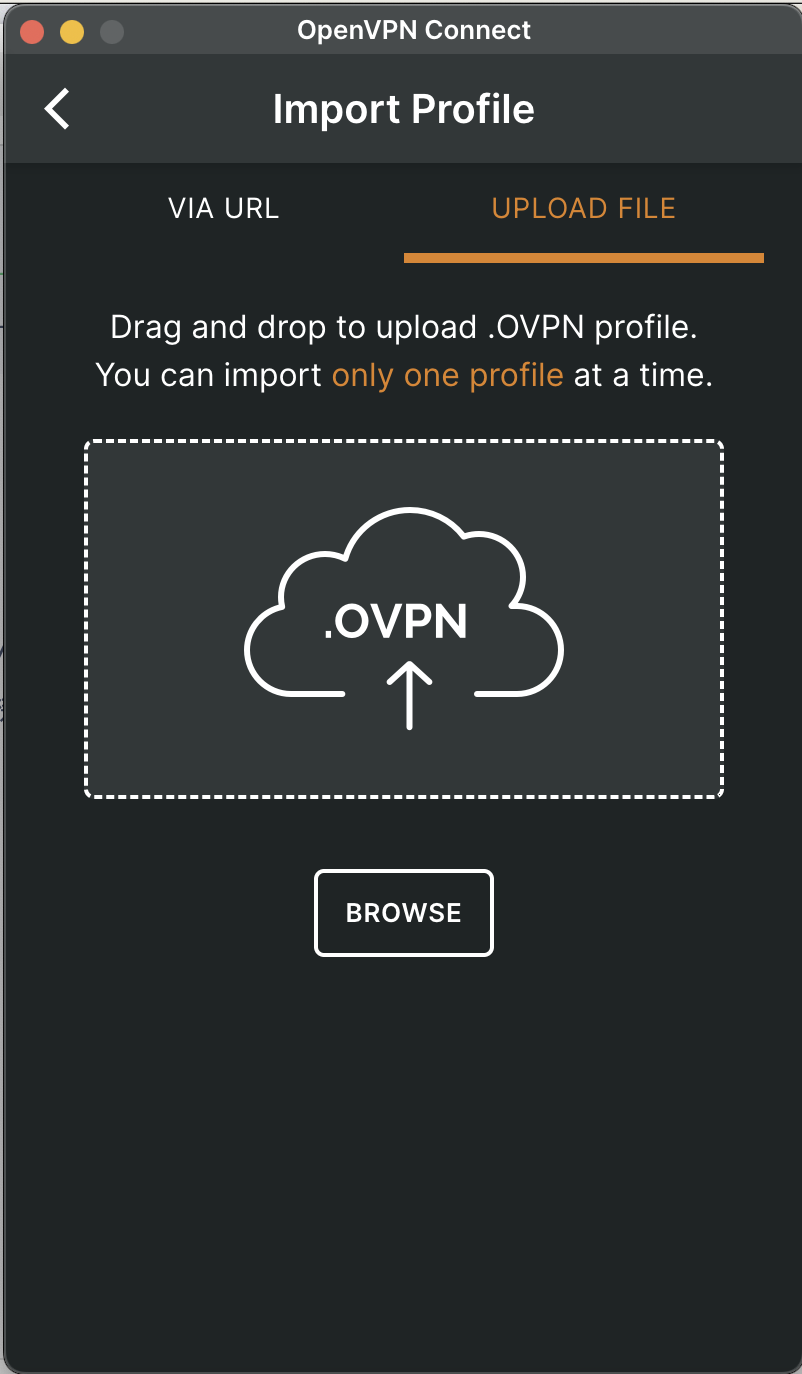
開啟軟體後先按下上角的選單 -> Import Profile,接著把檔案丟進去就大公告成了!
參考資料
HowTo:架設 OpenVPN 個體建立 Client-to-Site VPN 連線
PVE7.0 LXC容器开启TUN/TAP
[Proxmox VE 8.1.3] Unable to use TUN (/dev/net/tun) in Debian 12.2-1 container